Golangによるosm.pbf読み込み4
前回の記事では、osmpbfpを使って、だけでなく線や面(Way、Relation)もGeoJSONファイル出力するプログラムを作成しました。
だたし、サイズの大きいosm.pbfを処理対象とする場合には、メモリなどのマシンリソースや処理時間が長いなどの問題があることがわかりました。
今回は、別のプロダクト(paulmach/osmpbf)を使って、点(Node)と線や面(Way)をGeoJSONファイル出力するプログラムを作成したいと思います。
ただし、MultiPolygonなどを表現するRelationについては今回は対象外とします。
paulmach/osmpbfとは
paulmach/osmpbfとは、Goにてosm.pbfを取り扱うためのパーサーで、Paul Mach氏(アメリカの方のようです)がGitHub上で公開しています。
ライセンス形態はMITライセンスです。
API仕様は、以下に示されています。
https://pkg.go.dev/github.com/paulmach/osm/osmpbf
paulmach/osmpbfの特徴
paulmach/osmpbf(以降、単にosmpbfとします)の特徴は、以下の4つです。
- osm.pbfを並列に順次読み込むシンプルな仕様のため処理速度が速い
- 同じ理由でメモリ使用量が少ない
- osm.pbfだけでなくosm.xmlのパーサー(osmxml)も提供される
- Osmium Tool(後述)のadd-locations-to-waysに対応しておりWay要素読み込み時にNodeの座標も取得できる
Relation->Wayの関係はアプリケーションにて構築しなければならないので、この点が残念です。

Nodeは座標点、WayはNodeの集合、RelationはWayの集合として表現されます。
また、属性はタグと値で表現されNode、Way、Relationともに保有できます。
osmpbfのパッケージ構造
説明のタイミングとして微妙なのですが、ここでosmpbfのパッケージ構造を簡単に説明します。
osmpbfパッケージは、osmパッケージに依存んしており、osm.pbfのプリミティブ的なNodeやWayなどのプログラム的な表現(構造体)は、osmパッケージに収容されています。
後述しますが、osm.pbfから図形要素を取得するscanner型は、osmpbfパッケージに収容されています。
osm/osmpbfの構造
osm
├── element.go
├── feature.go
├── osm.go
├── object.go
├── node.go
├── way.go
├── relation.go
├── tag.go
└── osmpbf
└── scanner.go
ベクトルタイル作成までの流れ
以下にベクトルタイル配信までの流れを示します。
- 手順1 Osmium ToolによるNode-Way関係設定
- osm.pbfを操作するユーティリティOsmium Toolを使ってWayにNode情報を付与します。

- 手順2 osmpbfを使ってGeoJSON化
- osmpbfを使ったGoアプリケーションにより加工済みosm.pbfからGeoJSONを生成します。

- 手順3 Tippecanoeを使ってmbtiles化
- GitHub上で公開されているTippecanoeを使ってGeoJSONをmbtilesに変換します。
- 手順4 mbtilesを配信
- 地図配信サーバーを使って作成したmbtilesを配信します。今回は、TileServer-GLを使用します。
本記事では、手順1、2について説明します。
手順3、4については、以下の記事にて説明していますので、そちらをご確認ください。
Osmium ToolによるNode-Way関係設定
Osmium ToolによるNodeとWayの関係設定について、順次説明します。
Osmium Toolとは
Osmium Toolとは、osm.pbf(およびosm.xml)の内容を参照したり他の形式に変換したりするツールで、CLI(コマンドラインインタフェース)として提供されます。
シェープファイルを操作する時に使うGDALのogr2ogrやogrinfoと同じイメージです。
マニュアルは以下にあります。(英語です)
https://osmcode.org/osmium-tool/
Osmium Toolのインストール
Ubuntuの場合
バイナリパッケージが存在しますので以下のようにインストールできます。
$ apt-get install osmium-toolMacの場合
バイナリパッケージがありますので、Home Brewで以下のようにインストールできます。
% brew install osmium-toolCentOS8の場合
yumやdnfでインストールできるバイナリパッケージがありませんので、GitHubからソースを取得してビルドします。
基本的にはGitHubに書いてある通りですが、正確には以下のように作業します。
$ mkdir work
$ cd work
$ git clone https://github.com/mapbox/protozero
$ git clone https://github.com/osmcode/libosmium
$ git clone https://github.com/osmcode/osmium-tool

$ yum install libosmium-devel

$ cd osmium-tool
$ mkdir build
$ cd build
$ cmake ..
$ make

$ make install
GitHubに書いてあるインストール手順との違いは以下となります。
- yumでlibosmium-develをインストール
- make installの実行
インストールが成功すると、コマンドosmiumが使用できるようになります。
以下は、CentOS8でのバージョン確認結果となります。
$ osmium --version
osmium version 1.13.1 (v1.13.1-18-g202def6)
libosmium version 2.16.0
Supported PBF compression types: none zlib

Copyright (C) 2013-2021  Jochen Topf <jochen@topf.org>
License: GNU GENERAL PUBLIC LICENSE Version 3 <https://gnu.org/licenses/gpl.html>.
This is free software: you are free to change and redistribute it.
There is NO WARRANTY, to the extent permitted by law.
NodeとWayの関係設定
osmiumコマンドのadd-locations-to-waysオプションにより、NodeとWayの関係を追加したosm.pbfファイルを作成することができます。
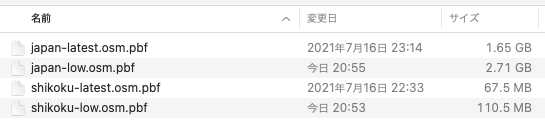
以下は、日本全国のosm.pbf(japan-latest.osm.pbf)に、NodeとWayの関係を設定した新しいファイルjapan-low.osm.pbfを作成する例です。
$ osmium add-locations-to-ways -n -o japan-low.osm.pbf japan-latest.osm.pbf
[======================================================================] 100%
私のマシン(Mac mini M1 メモリ16GB)では、上記の実行時間は、3分ほどでした。
以下のように、NodeとWayが関連づけられたファイルは元ファイルの1.64倍程度となっています。
osmiumのadd-locations-to-waysオプションのマニュアルは、以下にあります。
https://docs.osmcode.org/osmium/latest/osmium-add-locations-to-ways.html
GeoJSON出力プログラム
今回は、リポジトリ上のexample_stats_test.goを改修して、日本全国のosm.pbf(japan-latest.osm.pbf)のNode(点)要素の学校(amenityタグ=school)を抽出し、GeoJSONファイルに変換するプログラムを作成します。
https://github.com/paulmach/osm/tree/master/osmpbf
作成したソースコードは以下の通りです。
package main

import (
    "context"
    "fmt"
    "log"
    "os"
    "runtime"
    "strings"
    "time"

    "github.com/paulmach/osm"
    "github.com/paulmach/osm/osmpbf"
)

func main() {

    start := time.Now()

    f, err := os.Open("./japan-low.osm.pbf")
    if err != nil {
        fmt.Printf("could not open file: %v", err)
        os.Exit(1)
    }
    defer f.Close()

    // ファイルを書き込み用にオープン (mode=0666)
    file, err := os.Create("./output.json")
    if err != nil {
        log.Fatal(err)
    }
    defer file.Close()

    // FeatureCollectionレコード(ヘッダー的なもの)を出力
    file.WriteString("{\"type\":\"FeatureCollection\",\"features\":[\n")

    nodes, ways, relations := 0, 0, 0
    snodes, sways, srelations := 0, 0, 0
    cpu := runtime.NumCPU()

    scanner := osmpbf.New(context.Background(), f, cpu)
    defer scanner.Close()

    var endl bool
    for scanner.Scan() {

        switch e := scanner.Object().(type) {
        case *osm.Node:
            if e.Tags.Find("amenity") == "school" {
                snodes++
                // 最後のレコード出力時にはカンマを出力しない
                if endl {
                    file.WriteString(",\n")
                } else {
                    endl = true
                }
                // 要素情報の出力
                file.WriteString("{\"type\":\"Feature\",\"geometry\":{\"type\":\"Point\",")
                file.WriteString(fmt.Sprintf("\"coordinates\":[%.7f,%.7f]}", e.Lon, e.Lat))
                // 属性文字のエスケープ関連文字の訂正
                if strings.Contains(e.Tags.Find("name"), "\\") {
                    file.WriteString(fmt.Sprintf(",\"properties\":{\"name\":\"%s\"}}", strings.Replace(e.Tags.Find("name"), "\\", "", -1)))
                } else if strings.Contains(e.Tags.Find("name"), "\n") {
                    file.WriteString(fmt.Sprintf(",\"properties\":{\"name\":\"%s\"}}", strings.Replace(e.Tags.Find("name"), "\n", "", -1)))
                } else if strings.Contains(e.Tags.Find("name"), "\"") {
                    file.WriteString(fmt.Sprintf(",\"properties\":{\"name\":\"%s\"}}", strings.Replace(e.Tags.Find("name"), "\"", " ", -1)))
                } else {
                    file.WriteString(fmt.Sprintf(",\"properties\":{\"name\":\"%s\"}}", e.Tags.Find("name")))
                }
            }
            nodes++
        case *osm.Way:
            if e.Tags.Find("amenity") == "school" {
                sways++
                // 最後のレコード出力時にはカンマを出力しない
                if endl {
                    file.WriteString(",\n")
                } else {
                    endl = true
                }
                // 要素情報の出力
                if e.Polygon() {
                    file.WriteString("{\"type\":\"Feature\",\"geometry\":{\"type\":\"Polygon\",")
                    file.WriteString("\"coordinates\":[[")
                } else {
                    file.WriteString("{\"type\":\"Feature\",\"geometry\":{\"type\":\"LineString\",")
                    file.WriteString("\"coordinates\":[")
                }
                for i, v := range e.Nodes {
                    if i > 0 {
                        file.WriteString(",")
                    }
                    file.WriteString(fmt.Sprintf("[%.7f,%.7f]", v.Lon, v.Lat))
                }
                if e.Polygon() {
                    file.WriteString("]]}")
                } else {
                    file.WriteString("]}")
                }

                // file.WriteString(fmt.Sprintf("\"coordinates\":[%.7f,%.7f]}", e.Lon, e.Lat))
                // 属性文字のエスケープ関連文字の訂正
                if strings.Contains(e.Tags.Find("name"), "\\") {
                    file.WriteString(fmt.Sprintf(",\"properties\":{\"name\":\"%s\"}}", strings.Replace(e.Tags.Find("name"), "\\", "", -1)))
                } else if strings.Contains(e.Tags.Find("name"), "\n") {
                    file.WriteString(fmt.Sprintf(",\"properties\":{\"name\":\"%s\"}}", strings.Replace(e.Tags.Find("name"), "\n", "", -1)))
                } else if strings.Contains(e.Tags.Find("name"), "\"") {
                    file.WriteString(fmt.Sprintf(",\"properties\":{\"name\":\"%s\"}}", strings.Replace(e.Tags.Find("name"), "\"", " ", -1)))
                } else {
                    file.WriteString(fmt.Sprintf(",\"properties\":{\"name\":\"%s\"}}", e.Tags.Find("name")))
                }
            }
            ways++
        case *osm.Relation:
            if e.Tags.Find("amenity") == "school" {
                srelations++
            }
            relations++
        }

    }
    // FeatureCollection終端を出力
    file.WriteString("]}\n")

    if err := scanner.Err(); err != nil {
        fmt.Printf("scanner returned error: %v", err)
        os.Exit(1)
    }

    end := time.Now()

    fmt.Println("Start:", start)
    fmt.Println("End  :", end)
    fmt.Println("Elapsed:", end.Sub(start))

    fmt.Println("nodes:", nodes)
    fmt.Println("ways:", ways)
    fmt.Println("relations:", relations)

    fmt.Println("snodes:", snodes)
    fmt.Println("sways:", sways)
    fmt.Println("srelations:", srelations)

}
以降にポイントを解説します。
スキャナの生成とデータ取得
osm.pbfのパーサーは、スキャナ(Scanner)として提供されています。
以下に、スキャナの生成と図形要素取得部分を抜粋します。
    scanner := osmpbf.New(context.Background(), f, cpu)

    for scanner.Scan() {

        switch e := scanner.Object().(type) {
        case *osm.Node:
            // Nodeに対する処理を実装
        case *osm.Way:
            // Wayに対する処理を実装
        case *osm.Relation:
            // Relationに対する処理を実装
        }
- スキャナはosmpbf.New関数により取得
- osmpbf.Newの第3引数は並列数(=並列実行スレッド数)
- scanner.Scan()は次のオブジェクトが存在するかのチェックを行う(存在しない場合はfalse)
- scanner.Object()により、変数eに要素(Node、Way、Relation)を取得
要素の構造とタグ取得
取得した要素e(Elementの意味だと思います)には、osm.pbfに設定されているNodeやWay、Relationの持つ座標やプロパティ(属性)などが設定されています。
例えばNodeは、以下のような構造体となっています。(osm/node.goより抜粋)
// Node is an osm point and allows for marshalling to/from osm xml.
type Node struct {
	XMLName     xmlNameJSONTypeNode `xml:"node" json:"type"`
	ID          NodeID              `xml:"id,attr" json:"id"`
	Lat         float64             `xml:"lat,attr" json:"lat"`
	Lon         float64             `xml:"lon,attr" json:"lon"`
	User        string              `xml:"user,attr" json:"user,omitempty"`
	UserID      UserID              `xml:"uid,attr" json:"uid,omitempty"`
	Visible     bool                `xml:"visible,attr" json:"visible"`
	Version     int                 `xml:"version,attr" json:"version,omitempty"`
	ChangesetID ChangesetID         `xml:"changeset,attr" json:"changeset,omitempty"`
	Timestamp   time.Time           `xml:"timestamp,attr" json:"timestamp"`
	Tags        Tags                `xml:"tag" json:"tags,omitempty"`

	// Committed, is the estimated time this object was committed
	// and made visible in the central OSM database.
	Committed *time.Time `xml:"committed,attr,omitempty" json:"committed,omitempty"`
}
タグを取得する場合は、以下のように要素eの持つTags型のFind関数(osm/tag.goに存在)を呼び出し、タグのキー(”amenity”)に一致する値を取得し対応する値(Value)が”school”と一致するかを判定しています。
        case *osm.Node:
            if e.Tags.Find("amenity") == "school" {
WayからNodeの参照
この部分が今回の重要な部分です。
osm.pbf上でのWay要素は、NodeのIDを配列で保有しているのですが、座標は保有していないためこれが必要な場合はユーザーアプリケーションにてNodeの座標をバッファリングしたりデータベースに格納したりといった実装が必要です。
前述のosmiumのadd-locations-to-waysオプションにて作成したosm.pbfでは、(おそらく)Way要素にNode情報を保有しています。
osmpbfでは、以下のように要素e(Way)のメンバーであるNodesからfor rengeにより順次Node要素を変数vに取得します。
        for i, v := range e.Nodes {
          if i > 0 {
            file.WriteString(",")
          }
          file.WriteString(fmt.Sprintf("[%.7f,%.7f]", v.Lon, v.Lat))
        }
osm/Way.goでは、以下のような定義となっており、Way->WayNodes[]->WayNode.Latといった関係性となっています。
// Way is an osm way, ie collection of nodes.
type Way struct {
	XMLName     xmlNameJSONTypeWay `xml:"way" json:"type"`
	ID          WayID              `xml:"id,attr" json:"id"`
	User        string             `xml:"user,attr" json:"user,omitempty"`
	UserID      UserID             `xml:"uid,attr" json:"uid,omitempty"`
	Visible     bool               `xml:"visible,attr" json:"visible"`
	Version     int                `xml:"version,attr" json:"version,omitempty"`
	ChangesetID ChangesetID        `xml:"changeset,attr" json:"changeset,omitempty"`
	Timestamp   time.Time          `xml:"timestamp,attr" json:"timestamp"`
	Nodes       WayNodes           `xml:"nd" json:"nodes"`
	Tags        Tags               `xml:"tag" json:"tags,omitempty"`

	// Committed, is the estimated time this object was committed
	// and made visible in the central OSM database.
	Committed *time.Time `xml:"committed,attr,omitempty" json:"committed,omitempty"`

	// Updates are changes to the nodes of this way independent
	// of an update to the way itself. The OSM api allows a child
	// to be updated without any changes to the parent.
	Updates Updates `xml:"update,omitempty" json:"updates,omitempty"`

	// Bounds are included by overpass, and maybe others
	Bounds *Bounds `xml:"bounds,omitempty" json:"bounds,omitempty"`
}

// WayNodes represents a collection of way nodes.
type WayNodes []WayNode

// WayNode is a short node used as part of ways and relations in the osm xml.
type WayNode struct {
	ID NodeID `xml:"ref,attr,omitempty"`

	// These attributes are populated for concrete versions of ways.
	Version     int         `xml:"version,attr,omitempty"`
	ChangesetID ChangesetID `xml:"changeset,attr,omitempty"`
	Lat         float64     `xml:"lat,attr,omitempty"`
	Lon         float64     `xml:"lon,attr,omitempty"`
}
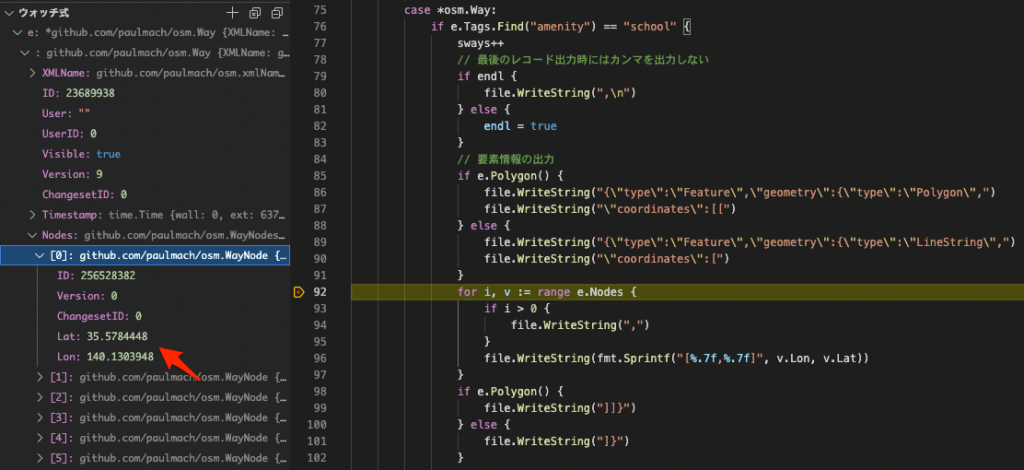
実際にブレークポイントを設定した状態が以下です。
変数e(Way)の中にNodes配列があり、そのメンバにID、Lat、Lonがあるのがわかります。
実行結果
私のPC(Mac mini M1 メモリ16GB)にて、japan-latest.osm.pbfを処理したところ、以下のように約23秒で処理が終了しました。
出力されたJSONファイルの要素数は以下のような結果でした。
- Node: 20,400(20,386)
- Way : 25,300(25,311)
- Relation: 301(301)
※()内の数値は、osmpbfperser-goでの変換結果の要素数。差異の原因は不明です。
抽出結果のGeoJSONをtippecanoeにてmbtilesに変換してtileserver-glにて配信した結果が以下となります。

配信URLは以下ですので、興味ある方は確認してみてください。
https://labo.takamoto.biz/learngo/
背景地図にはGeolonia社が開発しているOceanusを使用しています。
まとめ
今回は、osmuimとpaulmach/osmpbfを使って、osm.pbfからGeoJSONファイルを抽出するプログラムを作成しました。
ソースコードは、以下のGitHubリポジトリにて公開しています。
https://github.com/takamotobiz/learngo
今回使用したpaulmach/osmpbfはとても高速でよいと思いますが、Relation要素への対応にアプリケーションの開発が必要など課題があります。
次回は、paulmach/osmpbfを使ってRelation要素の対応をしようと思います。
コメント